
Media technology was essential throughout the entire process of our project, as the quality of the outcome would have declined greatly without access to those in hand. A wide variety of different computer programmes, software and websites were made available to us and we made sure to take full advantage of all that was offered. Technologies used:
We had encountered much of the technologies used during the previous year at AS, or simply in our own free time. Yet one integral programme throughout the creation process that we were not entirely familiar with, was Final Cut. This item of software allowed us to edit our clips together to produce a professional music video, whilst supplying a wide selection of features in lighting, effects and transitions. These all became of use once our shots were filmed and it was my time to piece together the recorded footage. Without access to Final Cut, we would have had to resort to a basic, more simplified editing application (such as Windows Movie Maker), sacrificing the quality of our eventual music video in the process. Considering the advanced nature of the software, the editing stage initially appeared daunting to us all and it had been a struggle to grasp the purpose of each of the many tools provided in the earlier days - as we were aware that the characteristic of the video depends heavily on the way in which it is edited. However, once accustomed to how Final Cut works following in-depth research into tutorials and by means of patience, I became comfortable with the equipment and was able to practice my new-found skills on the devlopment of our music video.
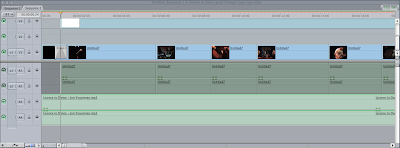
With so many options, buttons and the like - Final Cut could seem intimdiating on its first use. However, in respect to our intended 'indie' look that we had already established, we made sure to sure to avert many of these tools. If we had been asked to compose a music video for say, Katy Perry, Justin Bieber or the Black Eyed Peas - air brushing, special effects and a complete change in mise-en-scène would have been essential to maintain a sleek and glossy image that coincides with their superstar status. Our band would not slot in among these types, hence the avoidance of such procedures. Obviously, there were the necessities that were fundamental for the making of our music video. The 'in and out out points' were vital, allowing us to promptly select the precise segment of footage we desired to drag and insert on the Timeline. With over an hour of video, it would have otherwise been highly time-consuming without this particular implement. It was also important to remember to render the project each time a change was made, in order for the computer to process and permanently apply clips to the sequence. The idea of transitions is something we all further discussed as a group. Final Cut offers a vast selection, so it seemed silly to ignore these options. However when re-thinking the situation, transitions are best suited to ballads and mid-temp numbers - and the inclusion of one here would detract from the frantic and intense mood of their performance. Nonetheless, we did feature a cross-dissolve to fade in and out of the music video, as the sudden start and finish emerged as unprofessional.

Another tool we used towards our advantage was the Color Corrector. In our former draft cut, we had regrettably not made use of this option, but it's inclusion for the final cut was essential. Although provided with lighting at our chosen location, it was visible when re-watching the footage that the outcome was not as we hoped, depicting an unncecessary pink or red tint that I personally believed spolied the overall look of the video. Rather than shooting the entire film all over again, a more sensible idea was to use the Color Corrector. This device allowed us to adjust and improve the lighting conditions, whilst filtering any unwanted colours. Below are the before/after shots, and the difference is evidently substantial.
 I was already thoroughly experienced with the Photoshop CS4 software, thanks to the previous tasks at AS and occasional practice in my own free time, and it played a central role second year running – for the production of our ancillary tasks. Neither me, James or Sarah shared enough knowledge on how to use html coding for the website option, therefore we decided on the digipak and poster design; so a photo-manipulation programme was entirely necessary to construct an authentic style which conformed to industry’s conventions. Many of the specific tools used to create both ancillery tasks were visited beforehand. These included the magnetic-lasso tool; to cut out the individual scrabble pieces, the hue/saturation levels; to strengthen the colours and the text tool for the obvious. However, one feature I had not noticed was how to skew an object. This was needed for the inside booklet, when placing the text "SORRY FOR THE INTELLECT" on the playing board. As the photo had been taken at an angle, it was important to tilt the text for it to be perceived as believable - and not as though it had been simply pasted over the top of the picture. The procedure was fairly simple: Edit > Transform > Skew - and from then on I naturally had to play around with the text until I was satisfied with the result.
The particular site I am currently using to type this, Blogger, has been crucial for all presentation stages of our work. It has allowed us to post time-stamped entries and both quickly and regularly update on our progress. Every member of our group was already familiar with the tools, as a result of its usage at AS also. However without an introduction to Blogger, it would not have been possible to display our work through the other various media technologies, such as SlideShare and DivShare, and instead our work would have remained printed on plain paper, which would become tedious for myself and whoever chose to read the project.

Mozilla Firefox web browser was regularly used throughout the A2 course. Nowadays, the Internet is indespespensable for most and is relied on by many for both work and personal entertainment, with the ongoing expansion in social-networking sites (Facebook, Twitter etc). All information ever needed can often be located among the Internet, somewhere, thanks to the development of user-generated sites in recent years. Without online access, we couldn't host our work. We couldn't upload videos. Research would have been largely limited and we would instead have to go old-school, using the library as an alternative... which is likely to have been proven as ineffective and unproductive.

Although perhaps not a direct contribution towards our music video, video-sharing site YouTube allowed us to construct our research early on in the course. By watching tutorials and genuine music videos, we were able to come to grips first hand with the necessary conventions, whilst in the meantime conjuring ideas of inspiration. This site in particular is commonly known for displaying a wide variety in video content, with thousands of users uploading various clips every day, so YouTube was ideal for searching and analysing other music videos by artists within our bands select genre.

Obviously, the entire process would not have been remotely possible without a camera to shoot with. Within our school, the Media Studies department offer a selection of video cameras and our group had used the Sony DCR-HC62 - which specialises in recording footage. It's compact design allowed us to simply transport it around when filming the band, and it's tools were very simple to use; adjusting to its settings almost immediately.
The Grab tool is an application created specifically for Apple Mac computers, and was commonly used in the presentation process of our findings – specialising in capturing screenshots. This was a highly effective and advantageous piece of software, as it allowed us to promptly select an exact part of the screen to copy and then immediately save onto the computer, without opening a further photo-editing programme.
Vimeo was similarly used for the presentation process, to upload and host any of our videos (such as our animatic, audience feedback and various cuts). Alike YouTube, Vimeo is a video-sharing website in which much of its content is primarily produced by the site’s own users, and they show an exclusive dedication to this by removing most clips that neglect this rule. We were advised to use Vimeo by our teacher, and it was proven an ideal choice.
...and other Honourable Mentions.
dafont > A site solely for font downloads, offering thousands for free among their archives. Most of the typefaces used for our ancillery tasks had been found on dafont.com, therefore it was of great benefit to us.
Slide/DivShare > The aforementioned devices allowed me to display my work in new and exciting ways, rather than with pages of ordinary text, instead through the usage of sound clips and slideshow presentations. Both were highly beneficial and easy to utilise.
Photobucket > I chose to use this site last year to host various pictures for my blog, as it allowed animation and transparency for my images, whilst also keeping them organised in an orderly way. Although perhaps not the same extent, I continued to upload a few of my pictures there, as there were occassional technical difficulties and glitches with the tool provided by Blogger - which supposedly specialises in adding images.
No comments:
Post a Comment